Golang Beego automatically load templates
In this small post on how to automatically load a template so you don't have to 'include' your header and footer for every controller.
The idea
You have a layout that consist out of a header, a navigation, the container for the content and a footer, like this:
Now it doesn't make sense that you constantly have to rewrite the same code to include the, somewhat, static content like your header, navigation and footer. This can be easier!
The howto
Assuming you have the Beego framework all setup and running!
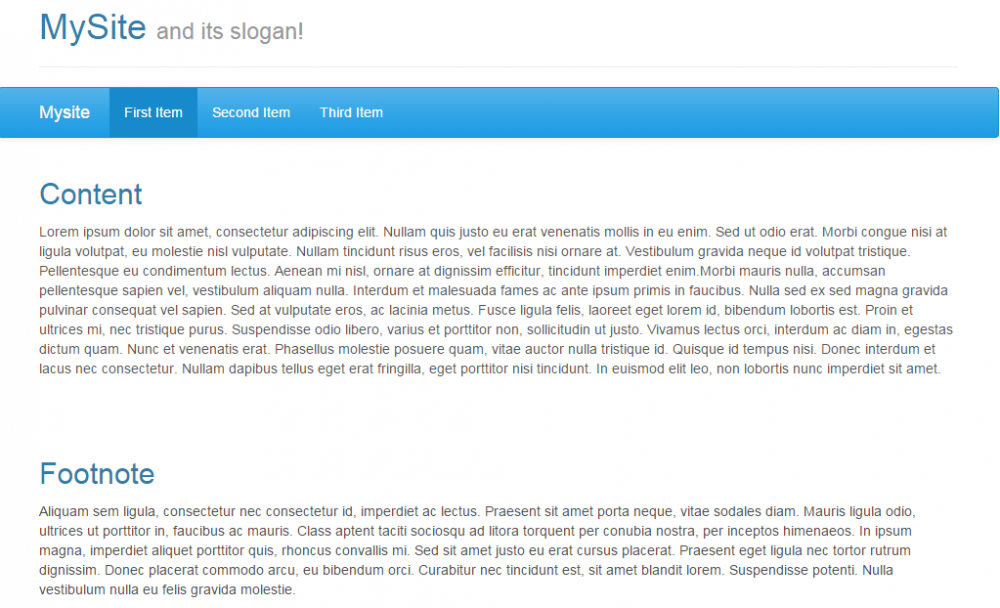
Separate your layout in templates
The html code of the image above is this:
<html>
<head>
    <meta charset="utf-8" />
    <meta name="viewport" content="width=device-width, initial-scale=1.0" />
    <title>Test</title>
    <link rel="stylesheet" href="https://maxcdn.bootstrapcdn.com/bootstrap/3.3.7/css/bootstrap.min.css" />
</head>
<body>
    <div class="container">
        <div class="page-header">
            <div class="row">
                <div class="col-md-12">
                    <h1>MySite <small>and its slogan!</small></h1></div>
            </div>
        </div>
    </div>
    <nav class="navbar navbar-default">
        <div class="container">
            <div class="navbar-header"><a href="#" class="navbar-brand navbar-link">Mysite </a>
                <button data-toggle="collapse" data-target="#navcol-1" class="navbar-toggle collapsed"><span class="sr-only">Toggle navigation</span><span class="icon-bar"></span><span class="icon-bar"></span><span class="icon-bar"></span></button>
            </div>
            <div class="collapse navbar-collapse" id="navcol-1">
                <ul class="nav navbar-nav">
                    <li role="presentation" class="active"><a href="#">First Item</a></li>
                    <li role="presentation"><a href="#">Second Item</a></li>
                    <li role="presentation"><a href="#">Third Item</a></li>
                </ul>
            </div>
        </div>
    </nav>
    <div>
        <div class="container">
            <div class="row">
                <div class="col-md-12">
                    <h2>Content </h2>
                    <p>Content goes here....</p>
                </div>
            </div>
        </div>
    </div>
    <div class="footer-clean">
        <footer>
            <div class="container">
                <div class="row">
                    <div class="col-md-12">
                        <h2>Footnote </h2></div>
                    <div class="col-md-12">
                        <p>Footer stuff goes here....</p>
                    </div>
                </div>
            </div>
        </footer>
    </div>
</body>
</html>
Now split these up in three seperate templates, which you'll save under your \MyBeegoSite\views\ folder.
header.html
<html>
<head>
    <meta charset="utf-8" />
    <meta name="viewport" content="width=device-width, initial-scale=1.0" />
    <title>Test</title>
    <link rel="stylesheet" href="https://maxcdn.bootstrapcdn.com/bootstrap/3.3.7/css/bootstrap.min.css" />
</head>
topnav.html
<body>
    <div class="container">
        <div class="page-header">
            <div class="row">
                <div class="col-md-12">
                    <h1>MySite <small>and its slogan!</small></h1></div>
            </div>
        </div>
    </div>
    <nav class="navbar navbar-default">
        <div class="container">
            <div class="navbar-header"><a href="#" class="navbar-brand navbar-link">Mysite </a>
                <button data-toggle="collapse" data-target="#navcol-1" class="navbar-toggle collapsed"><span class="sr-only">Toggle navigation</span><span class="icon-bar"></span><span class="icon-bar"></span><span class="icon-bar"></span></button>
            </div>
            <div class="collapse navbar-collapse" id="navcol-1">
                <ul class="nav navbar-nav">
                    <li role="presentation" class="active"><a href="#">First Item</a></li>
                    <li role="presentation"><a href="#">Second Item</a></li>
                    <li role="presentation"><a href="#">Third Item</a></li>
                </ul>
            </div>
        </div>
    </nav>
footer.html
<div class="footer-clean">
        <footer>
            <div class="container">
                <div class="row">
                    <div class="col-md-12">
                        <h2>Footnote </h2></div>
                    <div class="col-md-12">
                        <p>Aliquam sem ligula, consectetur nec consectetur id, imperdiet ac lectus. Praesent sit amet porta neque, vitae sodales diam. Mauris ligula odio, ultrices ut porttitor in, faucibus ac mauris. Class aptent taciti sociosqu ad litora
                            torquent per conubia nostra, per inceptos himenaeos. In ipsum magna, imperdiet aliquet porttitor quis, rhoncus convallis mi. Sed sit amet justo eu erat cursus placerat. Praesent eget ligula nec tortor rutrum dignissim. Donec
                            placerat commodo arcu, eu bibendum orci. Curabitur nec tincidunt est, sit amet blandit lorem. Suspendisse potenti. Nulla vestibulum nulla eu felis gravida molestie. </p>
                    </div>
                </div>
            </div>
        </footer>
    </div>
</body>
</html>
layout.tpl
This fill will connect everything together.
{{template "header.html"}}
{{template "topnav.html"}}
{{.LayoutContent}}
{{template "footer.html"}}
Create a custom structure inherited from 'beego.Controller'
Create a new Go file named 'extendedcontroller.go' in your \MyBeegoSite\controllers folder.
Here we will create a new type, which inherits the structure from beego.Controller and overwrite the Prepare() function. This function well be called before your actual Controller code, ideal for templates!
package controllers
import (
	"github.com/astaxie/beego"
)
type ExtendedController struct {
	beego.Controller //inherit
}
func (this *ExtendedController) Prepare() {
	this.Layout = "layout.tpl"
}
Create a new page
Now it's time to use our inherited controller. Create a new controller, a view for the new controller and set up the route to it!
The template test.tpl
Create this file in your views folder, purely as an example
<div class="container">
   <div class="row">
       <div class="col-md-12">
           <h2>{{.ContentTitle}}</h2>
           <p>{{.ContentText}}</p>
       </div>
   </div>
</div>
The controller test.go
Create this file under in your controllers folder.
package controllers
type TestController struct {
	ExtendedController // Inherit our, slightly extended controller
}
func (c *TestController) Get() {
	//Pass some data to the template
	c.Data["ContentTitle"] = "My title content!"
	c.Data["ContentText"] = "Lorum ipsum blablabla..."
	c.TplName = "home.tpl"
}
The c.TplName will be loaded into {{.LayoutContent}}
Set a route to it
In your router.go file add the following line in the init() scope:
beego.Router("/test", &controllers.TestController{})And you are good to go! Try it by running your server and open the \test page.
Passing data outside .LayoutContent
Now if you want to pass data to your topnav for example (to change the "active" class based on the controller) you'll have to change the layout.tpl and add a '.' (dot) before the closing curly brackets of the template you want to pass data to.
{{template "header.html"}}
{{template "topnav.html" .}} //Notice the change
{{.LayoutContent}}
{{template "footer.html"}}
Now you can access the controller.Data map like we have done in the test.tpl file.
Read also